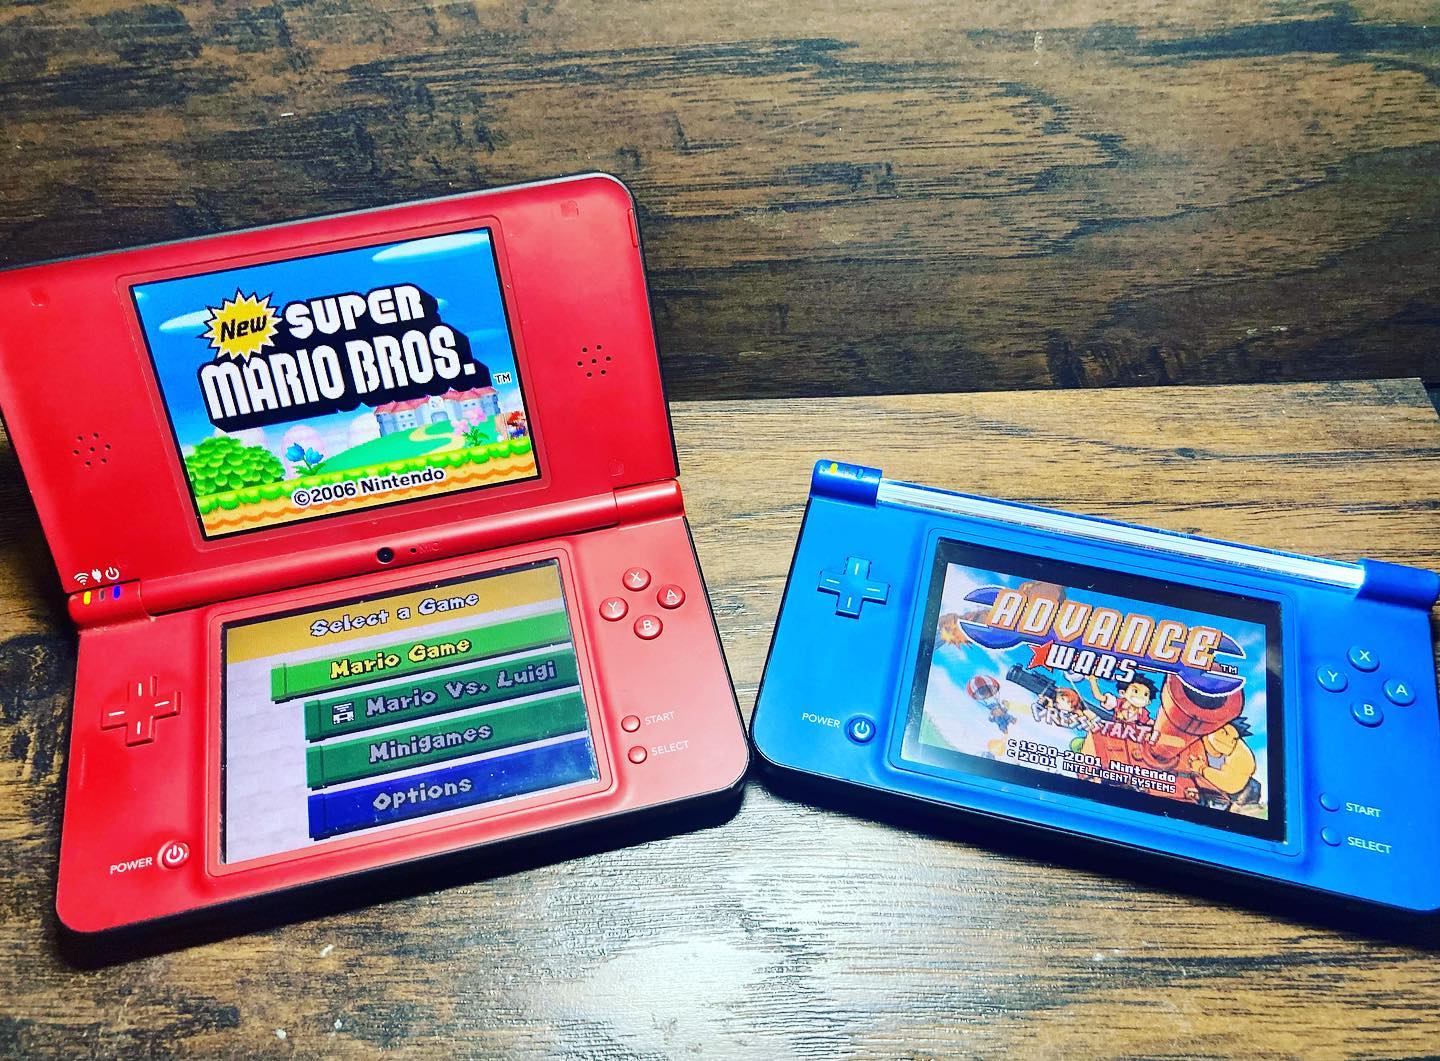
Nintendo DSi XL Macro Mod
Nintendo DSi macro mods aren’t for everyone, some people rage out when they see them. While it removes its main purpose (to play DS games with two screens); it’s something different.
The DSi Macro Mod turns your unit into an emulation device with tons of options. Check out the full feature list here: https://wiki.ds-homebrew.com/twilightmenu/
If you’re a tinkerer or collect consoles, sometimes scrap parts pile up and electronics can be repurposed so create something fun and different.
The purpose of this article was to show an alternate connection method for the DSi XL macro mod to trick the unit into thinking the top screen is connected. The current guides out there only shows one connection method.
I won’t go into the full mod instructions or disassembly here however Jack over at RearVueMirror has a great guide to follow for those wanting one.
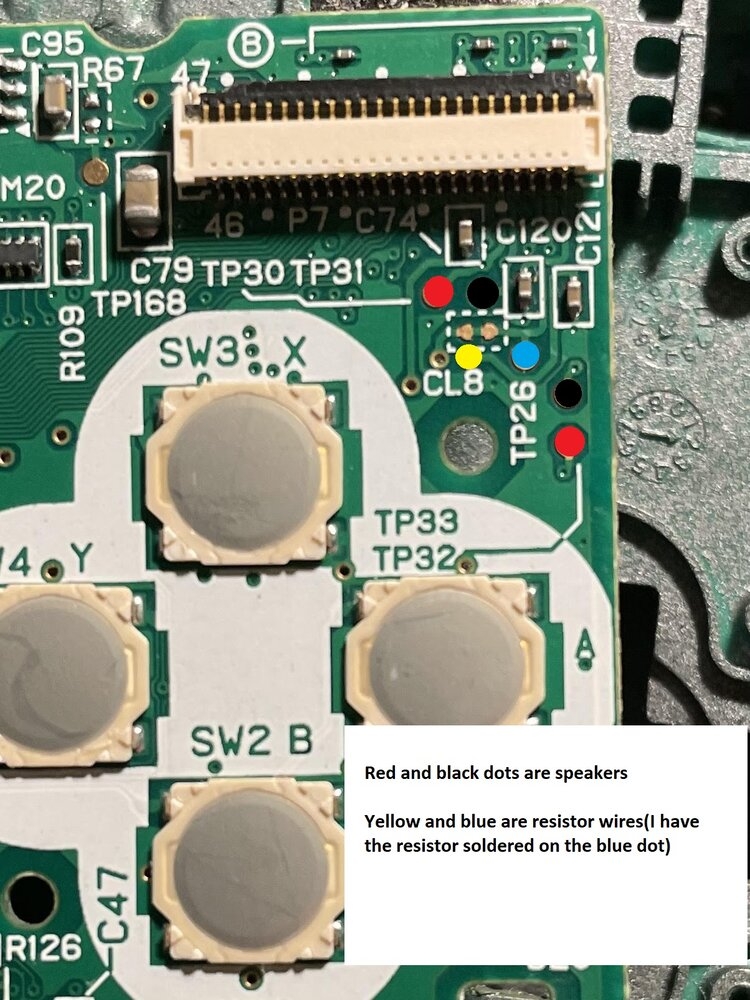
Working wiring points / diagram for this mod from a great guide @ Rearvuemirror here: https://www.rearvuemirror.com/guides/nintendo-dsi-xl-to-gameboy-macro-xli
b-b-b-but i did it and the DSi XL turns on and then turns off
Using the method above, with a 330Ω resistor on the yellow and blue points, when powering on the unit, it yielded a flickering DSi XL.
Trying both SMD and 1/4 watt radial resistors, same result, powers on, blue light and DSi XL screen flickers then it turns off.
This was bizarre but essentially telling me that the unit was not detecting the top screen; or in this case, the resistor.
The main issue being here is that the DSi XL needs the top screen to boot correctly.
Now maybe there was unseen VIA Damage, or perhaps something else was going on.
I am unsure, didn’t make much sense. After about 3-4 attempts on it, trying different configurations I tried something different.
Probing the connections I was able to find two more suitable out of the way contact points for the resistor to find its final resting place.
DSI XL Macro Mod Alternative Contact points for the 330Ω Resistor
Using a 0805 size smd 330Ω resistor, there is a spot directly on the opposite side of the board you can use.
A 0605 size would certainly fit much better, but I happen to have a 0805 330Ω sitting on a scrap laptop board 3 feet away.
For whatever reason, this worked first shot for me.
This also gives you more room to work with, and also clears up space for wires needed also to run an LED if wanted for the top bar if needed.
You will need to scrape the coating on the two VIA points revealing their copper points to solder to using either a small file or razer blade.
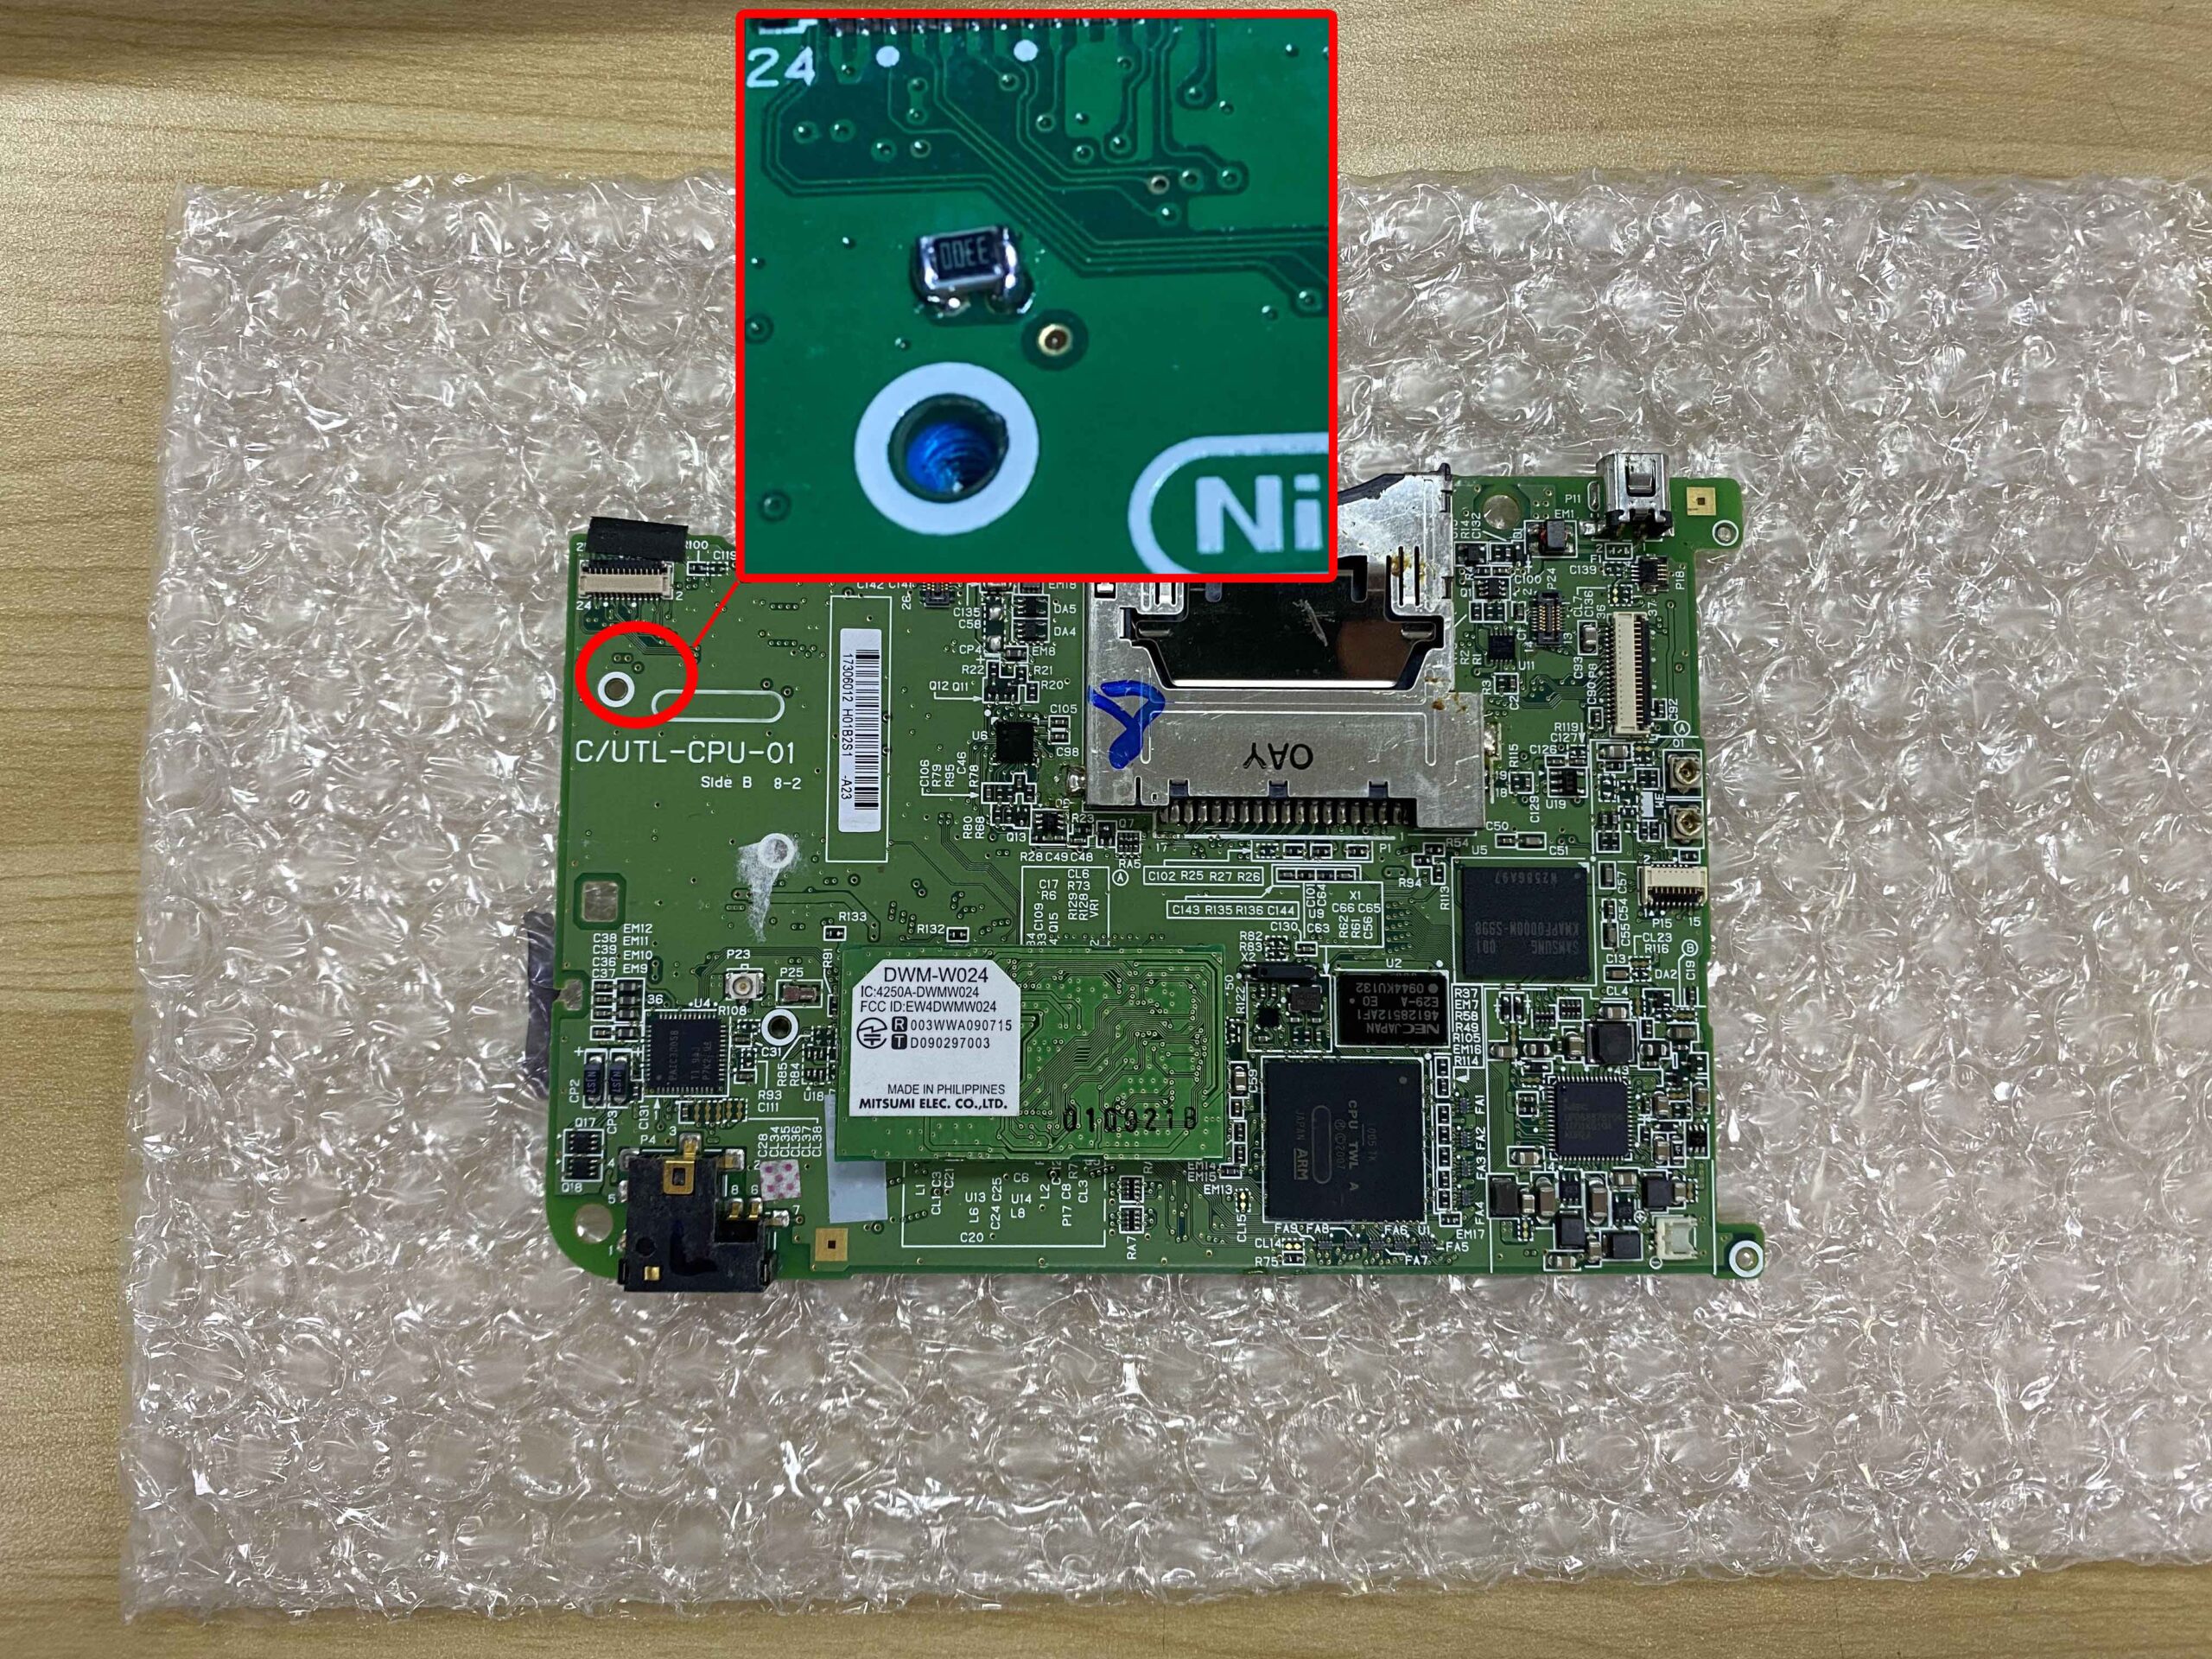
After doing this it booted normally and was able to finish the mod. Hopefully it helps someone else doing these in the future.
You saved my life! Thank you so much for writing this, you were the only person on the internet who explained this problem and helped solve it. Thank you very much!
yup, it was a bit insane to find. glad it helped someone else, that’s why i make these from time to time. send me some photos when you’re done. love to see them.
Sure! Helped me a lot!
I have a channel on Youtube and Instagram (Universo Game Boy) and I intend to post a video about this mod on the DSI XL. I was wondering if I could quote your website and your explanation during the video. If it weren’t for your tutorial, I would probably leave this board tilted to take out parts. But now, I have one more modified console.
Sure of course, no problem.
Hola ¿Donde podría soldar para tener una luz led? No encuentro la información. Gracias.
A conexão do LED vai para positivo e negativo do resistor adicionado. Pontos amarelos e azuis na foto do artigo aqui.
hello! I am using a 680ohm 1/4w 1% resistor, but for some reason every time I try to turn it on the LED turns blue, then red, the screen turns white and turns off, I can’t find the problem
is it SMD? or radial type resistor ? i’d have to see your wiring and soldering. perhaps it’s still trying to detect the upper screen.
hola! estoy usando una resistencia de 680ohm 1/4w 1%, pero por alguna razón cada vez que lo intento encender el LED se enciende de color azul, luego de color rojo, la pantalla enciende de blanco y procede a apagarse, no logro encontrar el problema
thx!i want to know where is the speaker contact point ?i want add 2 speaker